What Size Wire for EV Charger 2026: NEC Sizing Guide
The wire size for your EV charger depends on the charger amperage and the distance from your panel. Most Level 2 EV chargers need 6 AWG copper wire on a 50-amp breaker (for 40-amp chargers) or 4 AWG copper on a 60-amp breaker (for 48-amp chargers). Getting the wire size wrong means either a fire hazard from undersized wire or wasted money from oversized wire. This guide covers every EV charger scenario with NEC code references.
EV Charger Wire Sizing: The NEC Rules
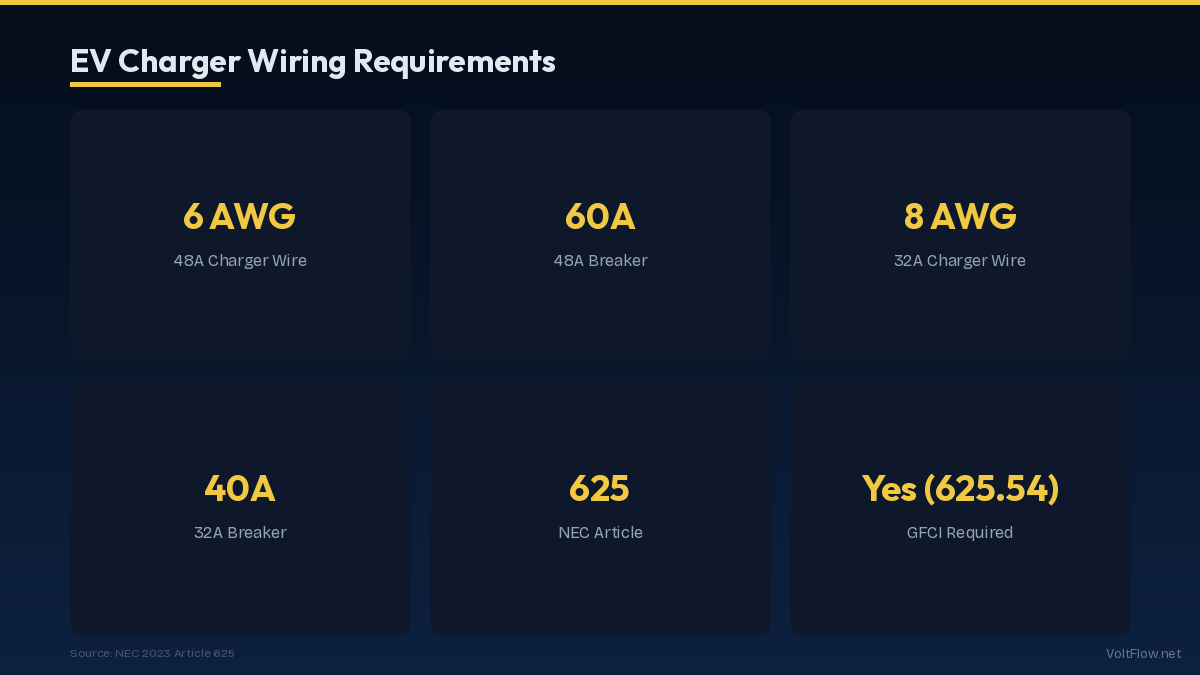
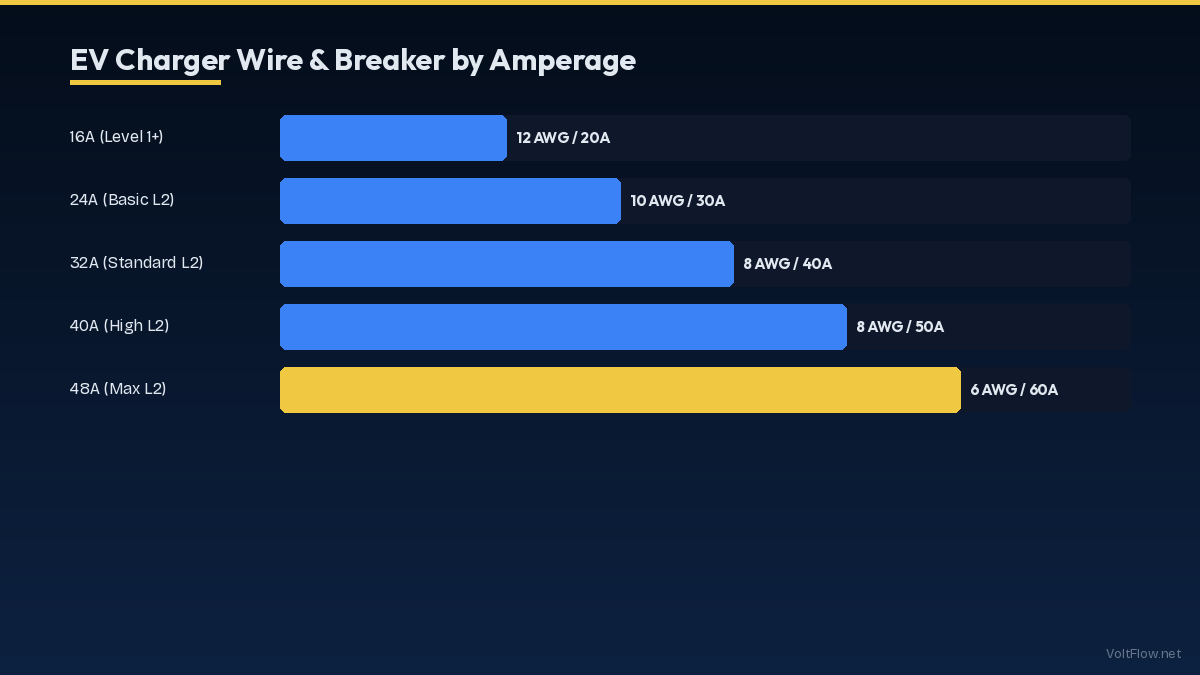
EV charger wire sizing follows two NEC requirements that work together: the wire ampacity must match the breaker size per NEC 240.4, and the breaker must be sized at 125 percent of the continuous load per NEC 210.20(A). The 125 percent rule applies because EV charging is a continuous load, the charger draws maximum current for three or more hours during every charging session. For a 32-amp EV charger, the calculation is 32 times 1.25 equals 40 amps. You need a 40-amp breaker and 8 AWG copper wire rated for 40 amps at 60-degree terminations. This is the entry-level configuration for many Level 2 chargers and provides approximately 25 miles of range per hour of charging. For a 40-amp EV charger, the most popular residential configuration, the calculation is 40 times 1.25 equals 50 amps. You need a 50-amp breaker and 6 AWG copper wire rated for 55 amps. This provides approximately 30-32 miles per hour and fully charges most EVs overnight in 6-8 hours. The ChargePoint Home Flex, Grizzl-E, and many other popular chargers operate at this level. For a 48-amp EV charger, the maximum common residential level, the calculation is 48 times 1.25 equals 60 amps. You need a 60-amp breaker and 4 AWG copper wire rated for 70 amps. The Tesla Wall Connector at its maximum setting and the JuiceBox Pro 48 operate at this level, providing approximately 44 miles per hour. This configuration delivers the fastest home charging but requires a panel with capacity for a 60-amp double-pole breaker. For a 24-amp EV charger, common in apartments and condos with limited panel capacity, the calculation is 24 times 1.25 equals 30 amps. A 30-amp breaker with 10 AWG copper wire handles this load. While slower at approximately 18-20 miles per hour, this configuration still adds 150-180 miles overnight and uses less panel capacity. For aluminum wire, size up two gauges from copper: where copper uses 6 AWG, aluminum needs 4 AWG. Where copper uses 4 AWG, aluminum needs 2 AWG. Aluminum costs about one-third of copper per foot and is a legitimate choice for EV charger circuits, especially on longer runs where the savings are substantial. Use anti-oxidant compound on all aluminum connections and ensure all terminals are rated AL-CU.
Voltage Drop Considerations for Long Runs
The wire sizes listed above are minimums based on ampacity alone. For runs longer than 50 feet, voltage drop calculations may require larger wire to maintain adequate voltage at the charger. Excessive voltage drop causes slower charging, increased energy losses, and can trigger error codes on some chargers. The NEC recommends keeping voltage drop below 3 percent for branch circuits. On a 240-volt circuit, 3 percent equals 7.2 volts, meaning the voltage at the charger should be at least 232.8 volts when drawing full current. The voltage drop formula for 240-volt single-phase circuits is VD equals 2 times K times I times D divided by CM, where K is 12.9 for copper, I is current in amps, D is one-way distance in feet, and CM is the circular mil area of the wire. For a 40-amp charger on 6 AWG copper at various distances: at 50 feet the voltage drop is 1.6 percent, acceptable; at 75 feet it is 2.4 percent, still acceptable; at 100 feet it is 3.2 percent, slightly over the 3 percent recommendation; at 125 feet it is 4 percent, requiring an upgrade to 4 AWG. For a 48-amp charger on 4 AWG copper: at 50 feet the drop is 1.2 percent; at 75 feet it is 1.7 percent; at 100 feet it is 2.3 percent; at 125 feet it is 2.9 percent; at 150 feet it is 3.5 percent, requiring an upgrade to 3 AWG. The practical takeaway is that 6 AWG copper works for 40-amp chargers with runs up to about 75-80 feet. Beyond that distance, upgrading to 4 AWG copper is recommended. For 48-amp chargers, 4 AWG copper works up to about 130 feet before needing 3 AWG. If your panel is in the basement and the charger is in a detached garage 100 feet away, plan for at least one wire size larger than the ampacity minimum to account for voltage drop. The cost difference is typically $1-$2 per foot, adding $100-$200 to the project, a small price for proper charger performance and electrical safety. Aluminum wire has approximately 62 percent of the conductivity of copper, meaning voltage drop is worse for the same gauge. When using aluminum for long runs, you may need wire three sizes larger than the copper minimum rather than the usual two sizes larger. Calculate voltage drop for your specific run length and charger amperage before purchasing wire to avoid costly mistakes or subpar charging performance that leaves your EV not fully charged each morning.
Plug-In vs Hardwired: Wire Requirements for Each
EV chargers install as either plug-in units connected to a NEMA 14-50 outlet or hardwired units connected directly to the circuit conductors inside the charger housing. The wire sizing is identical for both methods, but the installation details differ in important ways. Plug-in chargers require a NEMA 14-50R outlet at the charger location. The electrician runs 6/3 NM-B cable from the panel to the outlet box, installs the 50-amp breaker and the outlet, and your installation is complete. You plug in the charger yourself. The outlet provides the disconnect means required by NEC 625.43, so no additional disconnect switch is needed. The advantage is flexibility: you can unplug the charger to use the outlet for other purposes, replace or upgrade the charger without an electrician, and take the charger with you if you move. Hardwired chargers connect directly to the circuit conductors inside the charger enclosure or through a junction box. The electrician runs the cable from the panel to the charger location, strips the conductors, and terminates them on the charger terminal block. NEC 625.43 requires a disconnecting means for hardwired EV chargers, which can be the breaker in the panel if the panel is within sight of the charger, or a separate disconnect switch installed near the charger if the panel is not visible. An outdoor disconnect switch adds $50-$150 to the installation cost. Hardwired installation is required for chargers operating above 40 amps on a single circuit because the NEC limits plug-connected loads to the outlet amperage rating minus the continuous load derating. A 48-amp charger requires hardwiring to a 60-amp circuit. Hardwired installations also look cleaner with no visible outlet or dangling cord. For either installation method, the cable type depends on the routing. NM-B cable is appropriate for interior runs through walls, floors, and ceilings. UF-B cable or individual THWN conductors in conduit are required for exposed exterior runs, underground runs, and runs through areas subject to physical damage. The conduit method is most common for garage installations where the cable route crosses an exterior wall or runs exposed along the garage ceiling from the panel to the charger location.
Panel Capacity and Circuit Planning for EV Charging
Before running wire for an EV charger, verify that your electrical panel has both the physical space for the new breaker and the electrical capacity to handle the additional load. A 50-amp EV charger circuit requires two adjacent breaker slots for the double-pole breaker. Open your panel cover and check for available slots. If the panel is full with no empty slots, you have several options: replace two single-pole breakers with a listed tandem (piggyback) breaker to free up one slot, use a quad breaker to combine two circuits into the space of two slots while freeing two other slots, install a sub-panel to expand circuit capacity, or upgrade to a larger panel with more slots. The electrical capacity question requires a load calculation. Add up all existing breaker ratings, apply NEC demand factors, add the EV charger load at 125 percent, and compare the total to your main breaker rating. For most 200-amp panels serving homes with typical loads, a single 50-amp EV charger fits within capacity. Adding a second EV charger for a two-car household may push the calculated load past 200 amps. Load management devices offer a cost-effective alternative to panel upgrades when capacity is tight. The Emporia DCC-9 and similar devices monitor total panel current in real time and automatically reduce EV charging speed when other high-draw loads activate. When the air conditioner compressor starts drawing 30 amps, the load manager reduces EV charging from 40 amps to 20 amps, keeping total demand within the panel capacity. When the AC cycles off, charging ramps back up automatically. These devices cost $200-$400 installed and can eliminate the need for a $3,000-$5,000 panel upgrade. For households with two EVs, a power-sharing configuration provides the most cost-effective solution. The Tesla Wall Connector supports power sharing between multiple units on a single circuit. Two Wall Connectors on a shared 60-amp circuit each deliver 24 amps when both charge simultaneously, or one delivers the full 48 amps when the other is not charging. This approach uses one circuit instead of two, saving $500-$1,500 in additional circuit installation costs.
Cost Breakdown: Wire, Breaker, and Installation
Understanding the cost components of an EV charger wire installation helps you evaluate quotes and budget accurately. Materials represent a smaller portion of the total cost than most homeowners expect, with labor and permitting making up the majority. For a typical 40-amp charger installation with a 30-foot wire run from the panel to the garage, materials cost approximately $80-$130. This includes a 50-amp double-pole breaker at $15-$25, 30 feet of 6/3 NM-B cable at $3-$4 per foot ($90-$120), a NEMA 14-50 outlet at $12-$18 if plug-in, cable staples and box at $10-$15, and miscellaneous connectors and wire nuts at $5-$10. For a 48-amp charger with a 50-foot run using 4 AWG wire in conduit for an exterior installation, materials rise to $200-$350. This includes a 60-amp double-pole breaker at $20-$30, 50 feet of four 4 AWG THWN conductors at $3-$5 per foot per conductor ($600-$1,000 total but partially offset by no cable jacket cost), 50 feet of 3/4-inch EMT conduit at $1-$2 per foot, and assorted fittings, straps, and boxes at $30-$50. Labor costs range from $300-$800 for simple installations where the panel is in the garage near the charger location, to $800-$1,500 for complex installations requiring long runs, conduit, wall penetrations, or attic routing. An electrician typically spends 3-6 hours on a standard EV charger circuit installation. Permitting adds $50-$200 depending on jurisdiction. Some areas offer online same-day permits for standard residential circuits, while others require plan review that adds days to the timeline. The permit cost is almost always included in an electrician quote. Total installed cost for a standard 40-amp plug-in configuration runs $500-$1,200. A 48-amp hardwired installation with a longer or more complex wire run costs $800-$2,000. These costs do not include the charger unit itself, which adds $300-$700 depending on the brand and features selected. Get at least three quotes from licensed electricians. Provide each with the same information: your panel location and amperage, the desired charger location, the charger amperage, and whether you want plug-in or hardwired. This allows direct comparison of quotes for equivalent scope. The cheapest quote is not always the best value, verify that each quote includes the permit, inspection scheduling, and GFCI protection if your charger is in a garage where GFCI is required per NEC 210.8.
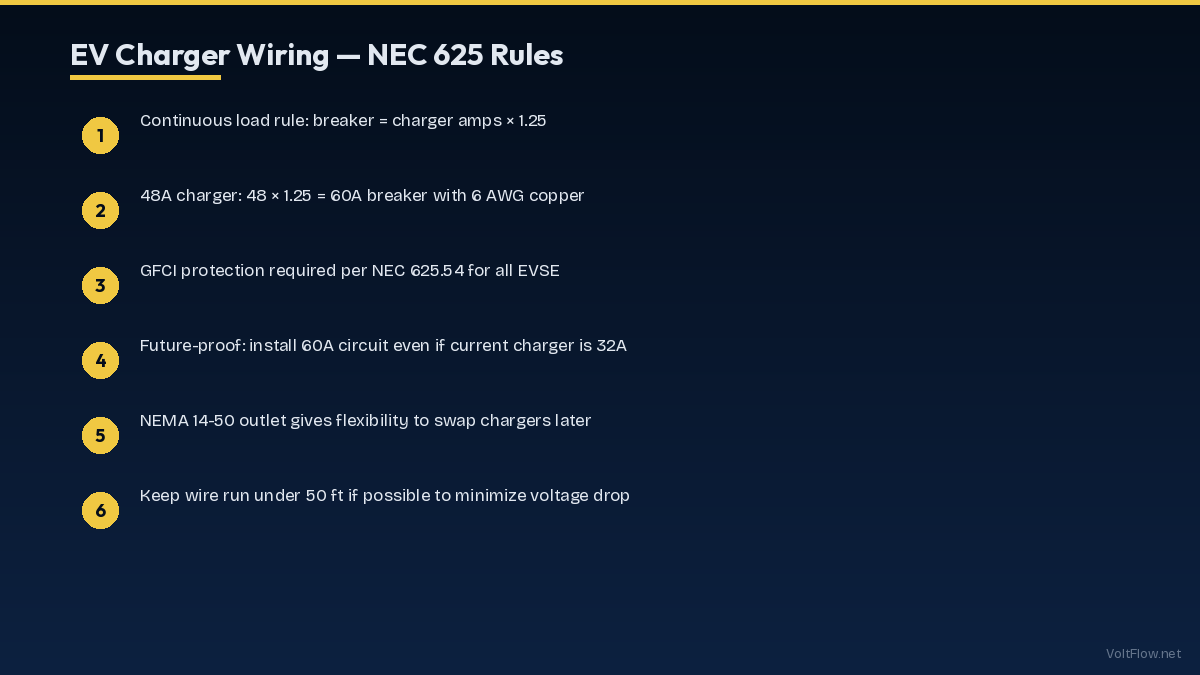
Future-Proofing: Wire for Tomorrow EV Needs
When investing in EV charger wiring, think beyond your current vehicle to your future needs. Running wire is the most expensive part of the installation because it requires opening walls, routing through attics or crawlspaces, and restoring finishes. The incremental cost of running larger wire or additional conduit during the initial installation is a fraction of the cost of doing it separately later. If you currently have a 40-amp charger but might upgrade to a 48-amp charger in the future, run 4 AWG wire now instead of 6 AWG. The additional cost is approximately $1.50-$2 per foot, adding $60-$100 for a typical 40-foot run. This allows you to simply swap the 50-amp breaker for a 60-amp breaker and install the faster charger without touching the wiring. If your household might add a second EV within the next five years, run a second conduit or cable route to the charging location now while walls are open or the electrician is already mobilized. Installing an empty conduit costs $50-$150 and saves $300-$800 compared to running a new circuit later as a standalone project. Alternatively, install the second outlet or junction box now and leave it capped for future use. Consider the emerging bidirectional charging standard that enables vehicle-to-home power backup. Future chargers with V2H capability may require different wiring configurations including dedicated transfer switch connections. While the specific requirements are not finalized, running a spare conduit from the panel to the charger location provides the pathway for future V2H wiring without additional wall work. Panel capacity planning is equally important for future-proofing. If your household plans to add a second EV and a heat pump within the next five years, evaluate whether your current panel can handle all three additions. A single 50-amp EV circuit fits most 200-amp panels. Two EV circuits plus a heat pump circuit may require load management or a panel upgrade. Addressing this during the first EV charger installation is cheaper and less disruptive than doing it as a separate project later. Some homeowners install a small sub-panel in the garage during their first EV charger project. A 100-amp sub-panel with 6-8 spaces costs $300-$600 installed and provides expansion capacity for a second EV charger, workshop circuits, and other garage electrical needs without returning to the main panel for each addition. The sub-panel feeder is sized for the full capacity, and individual circuits are added as needed over time.